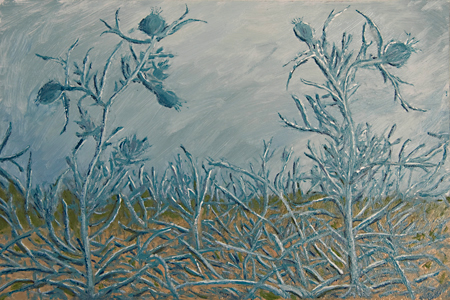
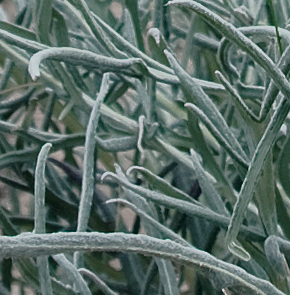
Pitcher thistle in oil and as photo.
To grab a sudden opportunity for my first lesson in Oil Painting, I selected a photo from the permanent ‘jewel’ collection on my lab top and printed it on an automatic printer in a German photoshop in the largest possible format, 15 x 23 cm.
The first happy experience was that the oil paint nicely adhered to the type of paper on which the photo was printed. Using the photographic image, an underpainting of the blue sky, the edge of green grass and the sand in the foreground was easily achieved.
The second insight, namely that oil paint is malleable, led to ecstasy. The very attribute that I had been apprehensive about turned out to be a heavenly asset – the slow drying of oil paint. Paint could be removed, added and its hue adjusted on the evolving pitcher thistle painting over the next few days.
To generate the thistle shapes, some of paint was now scratched away from sky/sand and the exposed leaves were underpainted with blue-green color.
Two problems came up.
One, the strict adherence to the photographic outline of the leaves resulted in a stiff look. Adding flourishes here and there loosened the stiffness. I realized that I had loved the thistles’ zest of life without really understanding it! Learning about their organic growth through making pencil sketches was not feasible because of the very limited time available, just enough to learn basic oil paining technique.
Two, having done an underpainting of most of the leaves, the picture now looked very boring, flat.
Feeling frustrated, I searched among my ‘jewel’ photographs for a new motif. At this time, Karl provided psychological painting advice: Stick with it and figure out how to make the picture interesting again.
Using my computer, I zoomed in on pitcher thistle leaves to study their lovely hues, different lightness of blue-green, whites, blacks, greys.
The best, I could think of doing was to deviate from my path of pursuing realism. Painting edges using using darker colors and lighter colors created a mottled look. That approach obliterated the earlier flat, boring look.
Now, back at home, I am making choices. One choice would be to get a gut feeling for pitcher thistles by (1) learning their characteristic through drawing and (2) learning their beautiful colors by painting excerpts as shown here.
Instead, I decided to follow the advice of my singing teacher from two decades ago ‘Do not repeat the same song over and over again, try some new ones’ and I selected a photograph showing water ripples. Last night, I did an underpainting of the motif on a proper canvas.
My real love, right now, is mixing colors. The color that I chose for last night’s underpainting resembles that of a favorite T-shirt way back. I am now liberated from fashion designers, I can invent my own hues.
For at least a decade, I had thought of trying my hand at painting. Did you have a similar experience that some new experience suddenly opened up for you?


Birgit:
A lovely painting. Great beginning. Your choices appear appropriate, which can be a big issue for people starting out.
I don’t know if you had other work in mind when doing this painting, but it certainly reminds me of a technique in glass where figured work – often sand blasting – is seen through a front surface. One will encounter such an effect in mirrors, glass door panels and a lot of interior design from the thirties.
If you are seeking to pass this down through the generations then you may want to check on the chemistry. Oil paint is acidic and will attack paper, causing brittleness and discoloration.
Sure. This year I discovered that a local manufacturer sells remnant plexiglass for a dollar a pound. Suddenly the entire dynamic of my endeavor has undergone a change as I substitute this stronger, more durable, transparent and colored, shiny material for the wood I had largely employed. .
Jay,
I had nothing much in mind, was just learning and improvising. Interesting thought that has some resemblance to a technique in glass where figured work – often sand blasting – is seen through a front surface. Maybe I should pursue that direction?
With me, plexiglas harks back to a long time ago when I made ‘lucite chambers’ filled with saline. Was fun working with that material.
Thanks for the warning about the photographic paper. I won’t use it again. I just got some ‘ampersand’ boards, covered with acid-free acrylic gesso that will be fun to work on.
Birgit,
It appears you made a good choice to start by painting over a photograph. There are so many things to be concerned with, it has always seemed overwhelming to me, so I haven’t even tried painting. Having the right teacher, of course, makes all the difference. I’m still hoping to do a bit myself one of these days.
You’ve certainly captured the essential gesture of these thistles, though I suspect that working on your smallish picture makes it harder to convey the slenderness of the leaves. I hope you come back to this subject some time. Meanwhile, we’ll look forward to your development as a colorist.
For me, (re)starting photography three years ago was a liberating experience. Learning guitar was also, but unfortunately I’ve been completely unable to keep that up in recent years.
P.S. How about adding a “painting” tag for this post, and maybe “edges” as well, to link up with the other “edges” posts lately? It’s a little hard to tell from the photo, but it looks like your color variations have helped make the stem and leaf edges stand out well from the sky.
Steve,
I chose the smallish size so that I could leisurely explore both the physics of the oil paint and the mechanics of brushes. In particular, my mentor gave me excellent advice concerning brushes of size 000. I agree, a larger size painting would make it easier to capture the ‘reality’ of the photograph that I am partial to.
Coming back to edges, they are very important to me. Doing the underpainting of my new image (12 x 12 inches) with a brush size 8, I am trying to avoid a ‘cotton candy’ effect that I observed in the oil painting of Jeff Ripple, originally a photographer, who is now trying his hand at oil painting. In a painting, exhibited last summer in his Michigan gallery in the village Empire, the sand on a steep dune looked fluffy reminding me of pink cotton candy .
Birgit,
Congrats on discovering the sensuality and practicality (what a combo!) of oil paints. You have made a wonderful start. If you really wanted to continue with photos, you could perhaps print on heavy paper or canvas (you can buy printable canvas) and coat it with clear acrylic medium. You should be able to see through the medium. You might have to use a sprayable acrylic medium to prevent the ink from running — experimenting could be a good thing –snort–
However, I think your choice of Ampersand is the better way to go. I found that because I freak out at drawing, using the brush was truly the way to liberate myself from my own neuroses. So now I just use a pretty innocuous transparent paint, like payne’s grey or raw sienna, outline the basic shapes and then go about painting, working all over the canvas, doing the big stuff first and the smaller later — making a kind of underpainting with the brush rather than drawing it in.
I am impressed with brush size 000 — I think I may have to order one. There’s also an exercise that my current take-to-bed author, Richard Schmid, highly recommends for the best (and, he claims, most fun) color learning possible; that’s to do the “traditional Flemish” color charts.
I googled a bit but couldn’t find anything like the charts that Schmid recommends — if you would like, I could copy his instructions and scan and copy the photos of his charts. They won’t be good for checking your color, but the instructions are really well done. And he’s very high on this process. I’m planning on doing the charts myself ASAP. They do look invaluable. He does them on board and then, when totally dry, he varnishes them and refers to them often, he says.
The book, by the way, is “Alla Prima: Everything I Know about Painting” by Richard Schmid. While he focuses on plein air painting, trying to imitate what the human eye sees, his range of information and advice is much wider than that. He studied with William H. Mosby, at Chicago. Mosby, if Google has any authenticity, is credited by large numbers of painters as an influence, although I couldn’t find anything much on his painting itself.
More than you wanted to know, but rereading your post made me feel that wonderful empowerment and excitement that encountering oils for the first time can bring about. Thanks.
June,
Thank you for your enthusiasm for my new start. I am about to order R.S’s book.
Doing the outlines with raw sienna sounds like a great idea.
I happened to be Googling for information about painting over photographs when I happened upon your post. Really good suggestions from you, the artist, and others who have responded. As I was thinking of trying just such a technique, I was thinking of using my trusty light table (light bars under a translucent plexi top) to paint over a photo. I know our local Postnet will print a photo (or original art) on an art fabric… it is a little expensive but you can get a bigger size and perhaps a more appropriate ‘canvas” with a nice texture. When I say a little expensive, I mean perhaps $40 for a 16X20 size… not bad.
Thanks so much for sharing your experience, it is just what I needed!
Donna,
Painting over a photo printed on art fabric sounds like a wonderful adventure!
you can make a photo transfer onto wood for example, by applying coats of gel medium, adhering the photo face down, and then removing the paper wiht a damp cloth. the ink in the photo is fixed in the gel medium. The photo is mirror image, and sometimes messes up, but still would give you the basic image to begin with.
Thanks, Patti,
That is good advice!